Tuesday, August 27, 2013
Friday, January 18, 2013
Pan Roasted Chicken Thighs with Lemon & Leeks
Clearly I haven't been the best blogger! I go through great times when I post, then I leave it alone. I'm going to try and be better through the winter because I really need to keep track of the meals we are eating! We're almost done with the third week of us eating very well, much more limited wine and in general behaving! I'm incredibly impressed with how well Keith is doing. I made a promise that he would like the food and wouldn't be hungry, which I have kept.
One of the things that helps with him is that I make dried fruit & nut bars for him to snack on. My favorite recipe is from Martha. The recipe can be found here. The servings say 8 bars, but we probably get 25 or so out of a batch. A little goes a long way.
I thought I'd start keeping track with a dinner that I made up after reading many magazines in the past few weeks! (I have stacks to catch up on...) We have really started to like using chicken thighs in many recipes that call for chicken. I did end up using bone-in, skin-on for this recipe so that I could render some of the fat and use it to cook in.
Ingredients: (2 servings)
Heat a cast iron skillet over medium to medium hi heat. Add oil to pan. Cut off some of the skin from the chicken and trim any excess fat. Season both sides of chicken with salt & pepper. Once oil is shimmering add chicken, skin side down. Let cook for about 10 mins without moving it. The skin should start to crisp and the chicken should be cooked partly through. Remove to a plate. Add leeks and soften slightly. Add 1/2 of lemon slices in with leeks, place chicken on top of lemons, skin side down. Place remaining lemons on top of chicken. Roast in oven 10-15 minutes until cooked through to 165.
Remove pan from oven and place back onto burner at medium heat. Place chicken, skin side up, onto plate. Add garlic to leeks & lemons in pan for 30 seconds, until fragrant. Deglaze pan with white wine. Cook until almost gone. Add half of chicken stock and bring to a boil, reduce this to half. The sauce should be thickening at this point. Add remaining broth and chicken back to pan to heat through.
Serve chicken with sauce over it. YUM!
Sidenote: We ate this with steamed broccoli and a salad.

One of the things that helps with him is that I make dried fruit & nut bars for him to snack on. My favorite recipe is from Martha. The recipe can be found here. The servings say 8 bars, but we probably get 25 or so out of a batch. A little goes a long way.
I thought I'd start keeping track with a dinner that I made up after reading many magazines in the past few weeks! (I have stacks to catch up on...) We have really started to like using chicken thighs in many recipes that call for chicken. I did end up using bone-in, skin-on for this recipe so that I could render some of the fat and use it to cook in.
Ingredients: (2 servings)
- 4-5 bone-in, skin-on chicken thighs
- 1 tbspn veg or grapeseed oil
- s&p
- one lemon, thinly sliced
- 2 med leeks, rinsed, cut in half and sliced
- 2 cloves of garlic, minced
- 3/4 cup of white wine
- 1 1/2 cups of chicken stock (preferably homemade as it thickens better)
Heat a cast iron skillet over medium to medium hi heat. Add oil to pan. Cut off some of the skin from the chicken and trim any excess fat. Season both sides of chicken with salt & pepper. Once oil is shimmering add chicken, skin side down. Let cook for about 10 mins without moving it. The skin should start to crisp and the chicken should be cooked partly through. Remove to a plate. Add leeks and soften slightly. Add 1/2 of lemon slices in with leeks, place chicken on top of lemons, skin side down. Place remaining lemons on top of chicken. Roast in oven 10-15 minutes until cooked through to 165.
Remove pan from oven and place back onto burner at medium heat. Place chicken, skin side up, onto plate. Add garlic to leeks & lemons in pan for 30 seconds, until fragrant. Deglaze pan with white wine. Cook until almost gone. Add half of chicken stock and bring to a boil, reduce this to half. The sauce should be thickening at this point. Add remaining broth and chicken back to pan to heat through.
Serve chicken with sauce over it. YUM!
Sidenote: We ate this with steamed broccoli and a salad.
Saturday, August 18, 2012
Summer Squash Bruschetta
By this time of the summer most people who have a vegetable garden are sick of zucchini and summer squash! Or constantly looking for new recipes! This is one of my favorites. It's actually pretty filling so I usually serve it with a big tomato salad or something else refreshing from the garden. As we do not have tomatoes yet this year, I served this batch with stuffed squash blossoms, another favorite!
 Bruschetta with Summer Squash, Bacon & Blue Cheese originally from Cook's Illustrated
Stuffed Squash Blossoms
- You can really stuff squash blossoms with just about anything! They are delicate so I try to keep that in mind. Typically i use a mixture of fresh ricotta, some shredded cheese, s&p, and some herbs. Mix it up to your liking.
To Prep:
Clean the blossoms as best you can. Mix together whatever you are going to stuff them with. Gently open each blossom and place some of the stuffing inside.
 Set up a 'breading' station using an egg wash and panko breadcrumbs for their more gently nature. I dip each blossom in the egg wash and then into the panko. Heat some olive oil in a pan to get it nice and hot. Then drop each blossom in to fry them up.
 Constantly turn the blossoms using tongs until all sides have a nice golden hue to them. Eat promptly!

- Dice and cook up about 4 slices of bacon, drain.
- Gather a few medium sized yellow squash (or zucchini), seed them and then cut into match-stick size pieces. Put them in a bowl and add a little olive oil, about a tablespoon or so of vinegar (any kind will do), and s&p. Let that stand for a few minutes.
- Meanwhile prep bread. Slice bread and place on baking sheet. Broil on each side about 3-4 minutes until desired doneness. Brush each side with a clove of garlic.
- Add the bacon, some crumbled blue cheese and herbs - basil, oregano, tarragon all work well - to the squash mixture. Divide mixture amongst bread slices and place under broiler for about 1 1/2 minutes.
Stuffed Squash Blossoms
- You can really stuff squash blossoms with just about anything! They are delicate so I try to keep that in mind. Typically i use a mixture of fresh ricotta, some shredded cheese, s&p, and some herbs. Mix it up to your liking.
To Prep:
Clean the blossoms as best you can. Mix together whatever you are going to stuff them with. Gently open each blossom and place some of the stuffing inside.
Monday, July 30, 2012
White Pizza with Arugula
One of my favorite 'farm dinners' is white pizza with arugula! I will take any cheese we have around the house,dough, herbed olive oil, make a pizza and top it with arugula! To add even more flavor this year, we got the BBQ Pizza Pan from Pampered Chef to cook it on the grill.

How to make this delicious pizza:
- If making pizza in the oven, place your pizza stone in 500 degree oven while dough is rising.
- I typically use store bought pizza dough from the refrigerator section. If I'm feeling inspired, which is more often in the winter, I will make my own. I let the dough rise for about an hour in a bowl greased with olive oil.
- While dough and pizza stone are prepping, make a quick flavored olive oil. Heat a half a cup of oil in a small sauce pan and add some garlic and whatever herbs you want. Hot pepper flakes are also a great addition.
- To roll it out: spread your work area with cornmeal to keep the dough from sticking. Stretch it out in your hands first, then put on work space and roll out to desire size. P.S. there are no rules as far as the shape!
- The best way to assemble the pizza is to cook the dough for a min or two before putting ingredients on. If I'm using the oven, I slide it on the pizza stone to get it slightly cooked.
- For the grill: Place the dough on the pizza pan, place on prepared grill for about 2 mins until you see slight char marks. Flip the dough over and repeat on other side.
- Either remove dough from oven or grill. Generously spread olive oil mixture over the dough and edges.
- Top with about 2 cups of grated cheese. This particular pizza I used Fontina, Cheddar and mozzarella. Parmesan is great too. This is definitely a personal preference!
- Spoon 4-5 dollops of fresh ricotta on top. Again, a personal preference but it's so good when you get fresh ricotta! If you are in RI or even the NE, you can get Narragansett Creamery Ricotta, which is to die for.
- Cook pizza for about 7 mins or until cheese is bubbly and melted.
- While pizza is cooking toss fresh arugula with olive oil and freshly ground salt & pepper.
- When pizza is done cooking place arugula right on top, slice & eat! YUM.
 Pizza dough stretched and rolled out with cornmeal.
 Toppings all set.
 Cooking on charcoal grill.
 Fresh arugula waiting to go on pizza.
Ready to eat!

How to make this delicious pizza:
- If making pizza in the oven, place your pizza stone in 500 degree oven while dough is rising.
- I typically use store bought pizza dough from the refrigerator section. If I'm feeling inspired, which is more often in the winter, I will make my own. I let the dough rise for about an hour in a bowl greased with olive oil.
- While dough and pizza stone are prepping, make a quick flavored olive oil. Heat a half a cup of oil in a small sauce pan and add some garlic and whatever herbs you want. Hot pepper flakes are also a great addition.
- To roll it out: spread your work area with cornmeal to keep the dough from sticking. Stretch it out in your hands first, then put on work space and roll out to desire size. P.S. there are no rules as far as the shape!
- The best way to assemble the pizza is to cook the dough for a min or two before putting ingredients on. If I'm using the oven, I slide it on the pizza stone to get it slightly cooked.
- For the grill: Place the dough on the pizza pan, place on prepared grill for about 2 mins until you see slight char marks. Flip the dough over and repeat on other side.
- Either remove dough from oven or grill. Generously spread olive oil mixture over the dough and edges.
- Top with about 2 cups of grated cheese. This particular pizza I used Fontina, Cheddar and mozzarella. Parmesan is great too. This is definitely a personal preference!
- Spoon 4-5 dollops of fresh ricotta on top. Again, a personal preference but it's so good when you get fresh ricotta! If you are in RI or even the NE, you can get Narragansett Creamery Ricotta, which is to die for.
- Cook pizza for about 7 mins or until cheese is bubbly and melted.
- While pizza is cooking toss fresh arugula with olive oil and freshly ground salt & pepper.
- When pizza is done cooking place arugula right on top, slice & eat! YUM.


Friday, July 27, 2012
Turtle Knoll Farm Dinners begin...
One of my absolute favorite things about having the vegetable garden is creating fun 'farm dinners' based on what is out there to be harvested. Saturday night, July 14, was our first of the summer in honor of the first zucchini. I'm trying a new variety this year called Green Tiger Striped Zucchini from Kitchen Garden Seeds, where I ordered a lot of seeds from this year for the first time. So far I've been very happy with most of what I started from them. I also grabbed a great bunch of beets from Brent at One Love Farm , who runs our local Richmond Farmers Market. My beets are coming in for the first time this year, but they were not quite ready for that night.


- Microwave Chips using the Pampered Chef Microwave Chip Maker and freshly dug potatoes
- Oysters and little necks on the grill
- Stuffed Zucchini on the grill
- Grilled Bread with herbed ricotta and beets
- Karl's Kitchen fresh kielbasa

Stuffed Zucchini
ingredients:
- sm - med zucchini's {1/2 serves 1 person}
- 1 sm onion, chopped
- 1 lb sausage {or whatever meat you like - we used the kielbasa in this one}
- 2 tbspns each of fresh parsley and basil
- 1/4 c bread crumbs
- 1/2 c Parmesan, some reserved
- 1 egg, beaten
- s&p
*We cooked the above in that baking pan on the grill for a half hour. We did cover it with tinfoil for 15 mins to make sure it was cooked through.
**I do not pre-cook the zucchini because I feel that the half hour or so that it spends cooking is enough and leaves some of the crunch.
- Crumble sausage and heat over medium heat. When it's about 2/3 done, add the onion. Cook until soft and starting to brown. As removing from heat add the basil and parsley. Let mixture cool slightly.
- Cut off each end of the zucchini to the size that fits into the dish you are using to cook them. Scoop out middle so they look like boats.
- In medium bowl toss together sausage & onion mixture, bread crumbs, parm, s&p. Blend together with egg.
- Fill each 'boat' with mixture and top with remaining cheese. Bake in a 350 degree oven for a half hour.

Grilled Bread with Herbed Ricotta and Beets:
ingredients:
- good bread, sliced about a half inch think on an angle
- olive oil
- garlic
- Ricotta, fresh if available
- Herbs: dill, chives & scallions
- baby beets
- s&p
- To make herbed ricotta: mix 1 cup of ricotta with about 2 tbspns each of dill, chives & scallions (or whatever you would like.) Taste to get desired flavor.
- Beets: cut tops and bottoms off. Toss with olive oil, s&p and wrap in tinfoil. Either roast in oven at 400 degrees for an hour or place on grill for an hour. Let cool completely, peel and slice.
- Grill bread for 1-2 mins on each side until desired doneness. Remove from heat, brush with olive oil and rub with garlic. Sprinkle with a little s&p.
- Spread bread with ricotta and layer with beets.

Thursday, June 21, 2012
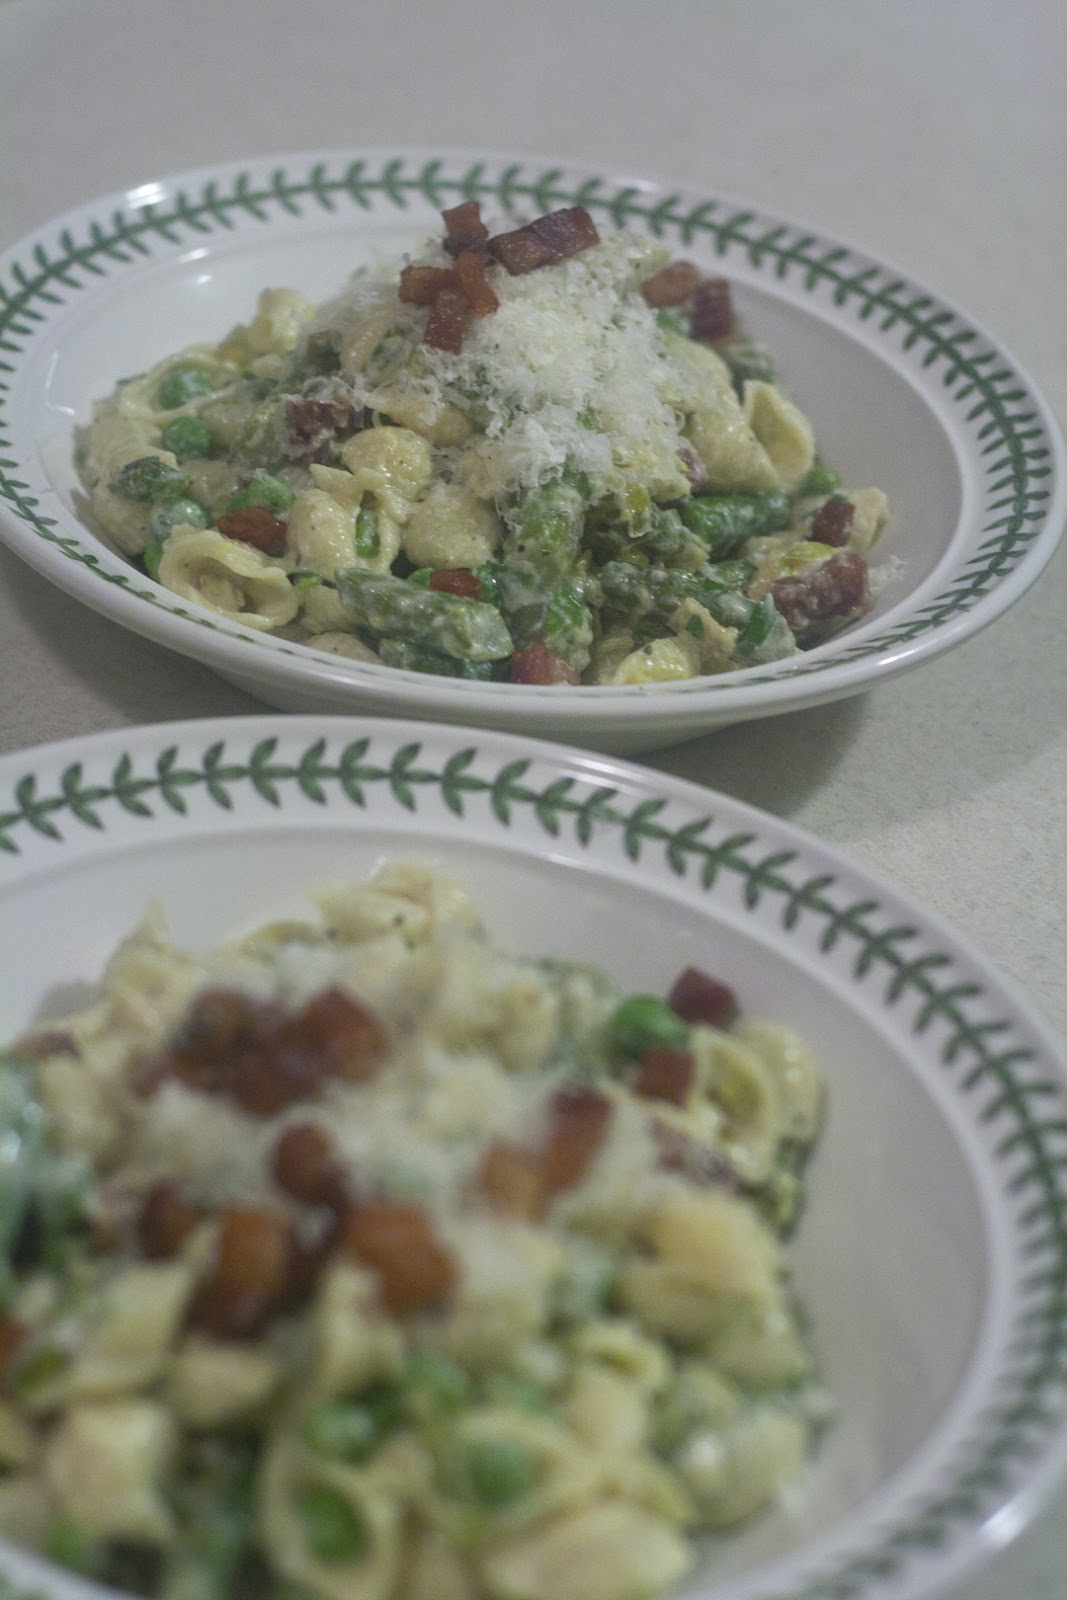
Asparagus Recipes... pasta
Part of this blog is supposed to be about what we (I) cook as the vegetable garden is harvested! We're already past one crop and I haven't posted a recipe yet... sorry!
The asparagus was delightful... I picked about a pound a week, which was just perfect. I kept most of it and passed a few spears along to willing recipients. Really - if you have a spot for asparagus, it's 100% worth it. The first year is a little work as you slowly have to fill in the trenches, but after that it's a very easy crop. Refer to this post about planting and growing it. I have had no problems with pest and disease, which is partly because it comes so early in the season. How can you beat picking fresh asparagus once a week for 6 weeks!
We made a few new recipes using the asparagus which I will post over the next few days. This is one of my favorites: Pasta with asparagus & pancetta. I've adapted it from a few recipes that I've seen around - the main inspiration from a recipe out of Bon Appetit sometime in the spring of 2010.

12 oz pasta - shells or something absorbs yummy sauce!
3 oz pancetta, diced
1 lb asparagus, trimmed and cut into 1-inch pieces on the diagonal
2 cups of peas - fresh shelled or frozen
1 bunch scallions, white & lt green parts thinly sliced
2 garlic cloves, crushed
1/2 cup Parmesan or Romano, plus extra for serving
1/2 cup of ricotta
3 tbspns olive oil
3 tbspns fresh lemon juice
zest from one lemon
1/4 cup of fresh parsley or tarragon is good with this too
To cook ingredients:
 ** This pasta is easy and great to make throughout the summer as more vegetables come in. You could use summer squash, cook it until there is still a little crunch left. Add peppers, eggplant and anything else you have! I'll post as we use this pasta recipe with other vegetables.
The asparagus was delightful... I picked about a pound a week, which was just perfect. I kept most of it and passed a few spears along to willing recipients. Really - if you have a spot for asparagus, it's 100% worth it. The first year is a little work as you slowly have to fill in the trenches, but after that it's a very easy crop. Refer to this post about planting and growing it. I have had no problems with pest and disease, which is partly because it comes so early in the season. How can you beat picking fresh asparagus once a week for 6 weeks!
We made a few new recipes using the asparagus which I will post over the next few days. This is one of my favorites: Pasta with asparagus & pancetta. I've adapted it from a few recipes that I've seen around - the main inspiration from a recipe out of Bon Appetit sometime in the spring of 2010.
12 oz pasta - shells or something absorbs yummy sauce!
3 oz pancetta, diced
1 lb asparagus, trimmed and cut into 1-inch pieces on the diagonal
2 cups of peas - fresh shelled or frozen
1 bunch scallions, white & lt green parts thinly sliced
2 garlic cloves, crushed
1/2 cup Parmesan or Romano, plus extra for serving
1/2 cup of ricotta
3 tbspns olive oil
3 tbspns fresh lemon juice
zest from one lemon
1/4 cup of fresh parsley or tarragon is good with this too
To cook ingredients:
- Cook pasta according to directions, drain, reserve 1 cup of water and put pasta back into pot.
- Heat 12 inch nonstick skillet over medium heat. Cook pancetta until nice and crispy; remove with slotted spoon to a bowl.
- Add asparagus to pan, saute for 3 mins. Add peas & scallions, cook for about 2 mins. Add garlic until fragrant, 30 secs. Remove from heat.
- Add vegetable mixture to pasta in the pot, about a 1/4 cup of the reserved pasta water, 1/2 cup of cheese, olive oil, lemon juice & lemon zest. Mix together and season liberally with salt & pepper. Add ricotta by the spoon full and mix to desired consistency, thinning with more pasta water as needed. Add fresh herbs and 2/3 of pancetta. Transfer to serving plates and sprinkle with remaining pancetta and cheese.

Wednesday, June 6, 2012
May Flowers...
The flowers in my garden are just as important and rewarding as the vegetables! I am all about having fresh cut flowers around the house as much as possible. I've managed to get it so that I have them for most of the year from cutting flowers in the summer to Holiday arrangements and then forcing flowering trees come winter.
Of course, I have a favorite... I wait for 11 months out of the year for my peonies! When I first showed up at this house & property it was completely overgrown and overwhelming. During that first spring I had one thought "thank God it isn't me keeping up with this!" Famous last words. As overgrown as it was, you can imagine my delight when come early June, I was rewarded with the most incredible peony border. There is a saying that peonies are no fuss, and the fact that they had been neglected for 8 years and were still incredible, shows that. I've tended to them, split them up some and added to them. It's taken a few years for the ones that I dug out to start producing many buds again. This year has to be a banner year - I'm cutting bunches and bunches about every 5 days. I'll be sad when they're gone, and then rewarded again as all the rest of my annuals and perennials start to burst open.
All those gorgeous buds ready to burst open around May 20 (which was very early!):


A shot as the early light pink ones are open and the fuchsia are starting to open - I do not know what kind they are. There were 3 varieties here and I added 2.


There are are 2 Siberian Iris here, this purple and yellow is in the main garden. Once I cleaned the garden out, it grew like crazy so I split it up all over the place!

Living across the street from a garden center/ farm stand has quite a few benefits! One being that Cindy, the owner, hates to get rid of the end of the season flowers so she ends up loading up my car! This was a flower that I never knew existed and now I don't know what I would do without it at this time of year! She gave me a flat 2 years ago so that I have it scattered about - I love the variegated flower! It's called Malva:

Not to be left out: my poppy! I get a good 6 or 7 buds now. This year we dug up my Mom's and put it in my garden so hopefully next year I'll have them throughout.

About 2.5 years ago, we thought my parents would not be in their house for another season so we dug up as much as we could and transplanted to a variety of places. I was fortunate enough to receive all of my Mom's roses. We put most of them in my veg garden. This is my favorite. Finally this year I was rewarded with many of the gorgeous, bubble-gum pink flowers with the most delightful scent. Hoping I'll be able to get it to flower like this again later this summer. Roses are something I'm still figuring out. I have black spot all over them right now so they lost leaves. I've fed and treated them with a systemic, which was likely a little late hence the problems.


The vegetable garden is about 95% set. I'll post about what went in there along with some of the preventative measures I'm taking. I've already spotted a few unfriendly guests, which means I have my work cut out for me this season.
Subscribe to:
Comments (Atom)